
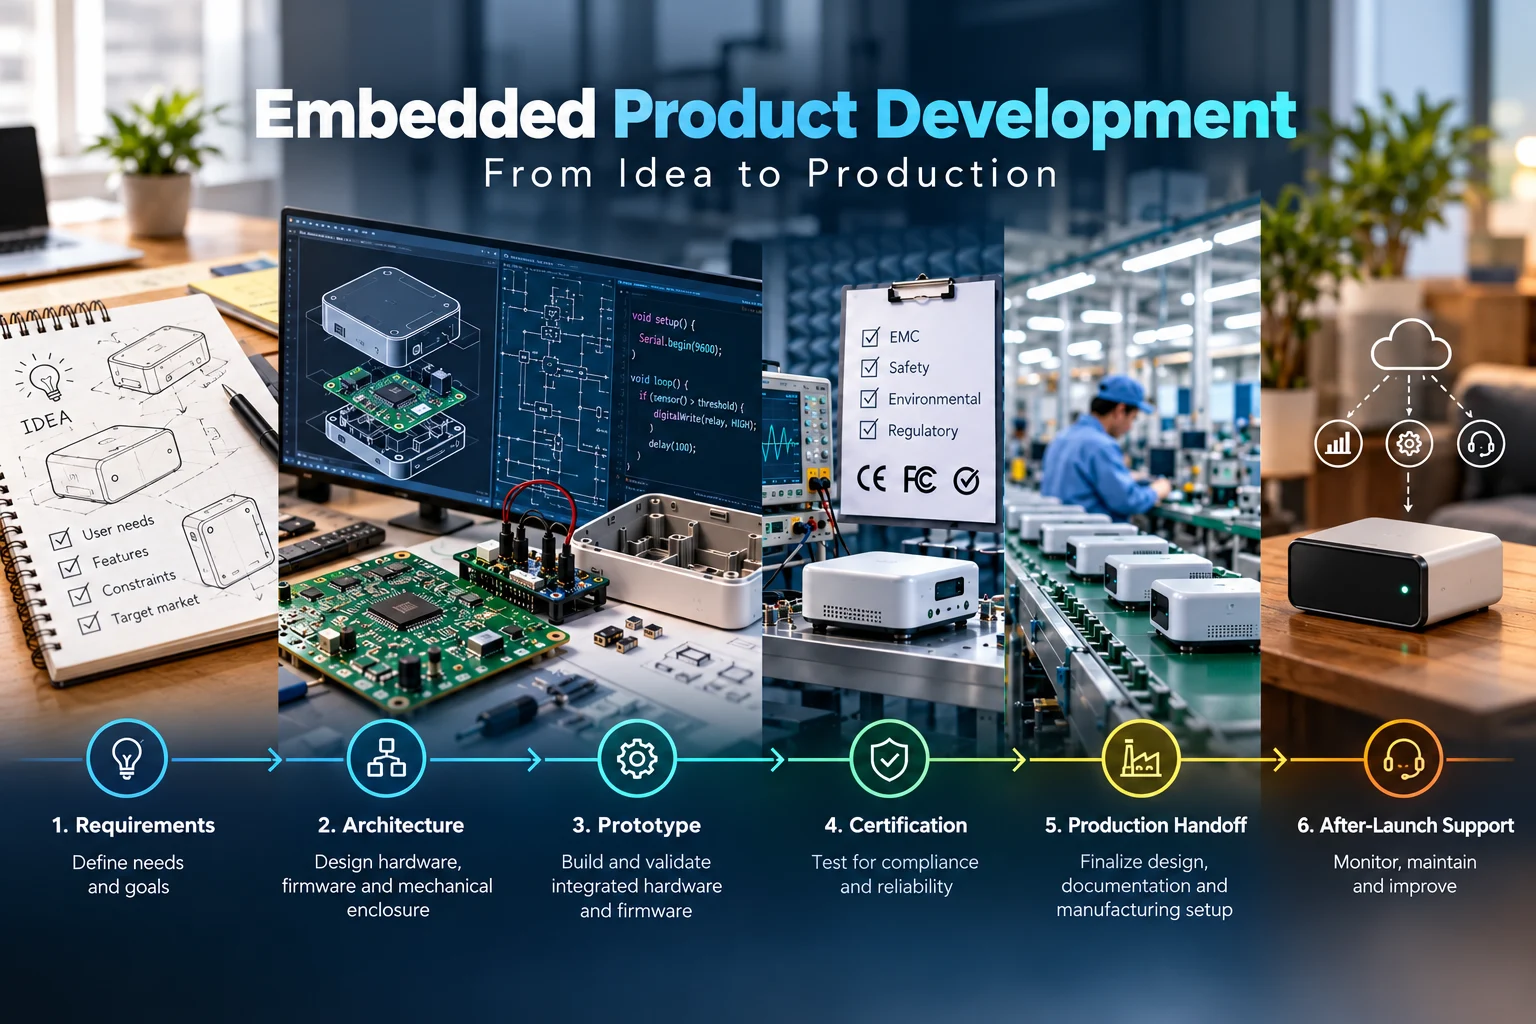
Embedded product development is the process of turning a product idea into a manufactured device in which hardware, firmware and software work as one system. It moves through six stages: requirements, architecture, prototyping, certification, production handoff and support after launch.
Most delays do not come from the first prototype. They come later, when a working board meets a factory line, a certification lab or a field update. This guide walks through each stage, shows what the firmware must reach at every build, and covers the compliance steps Indian teams often meet too late.
It is written for engineering leads, OEM product managers and hardware founders who need a workable plan.
Embedded product development at a glance
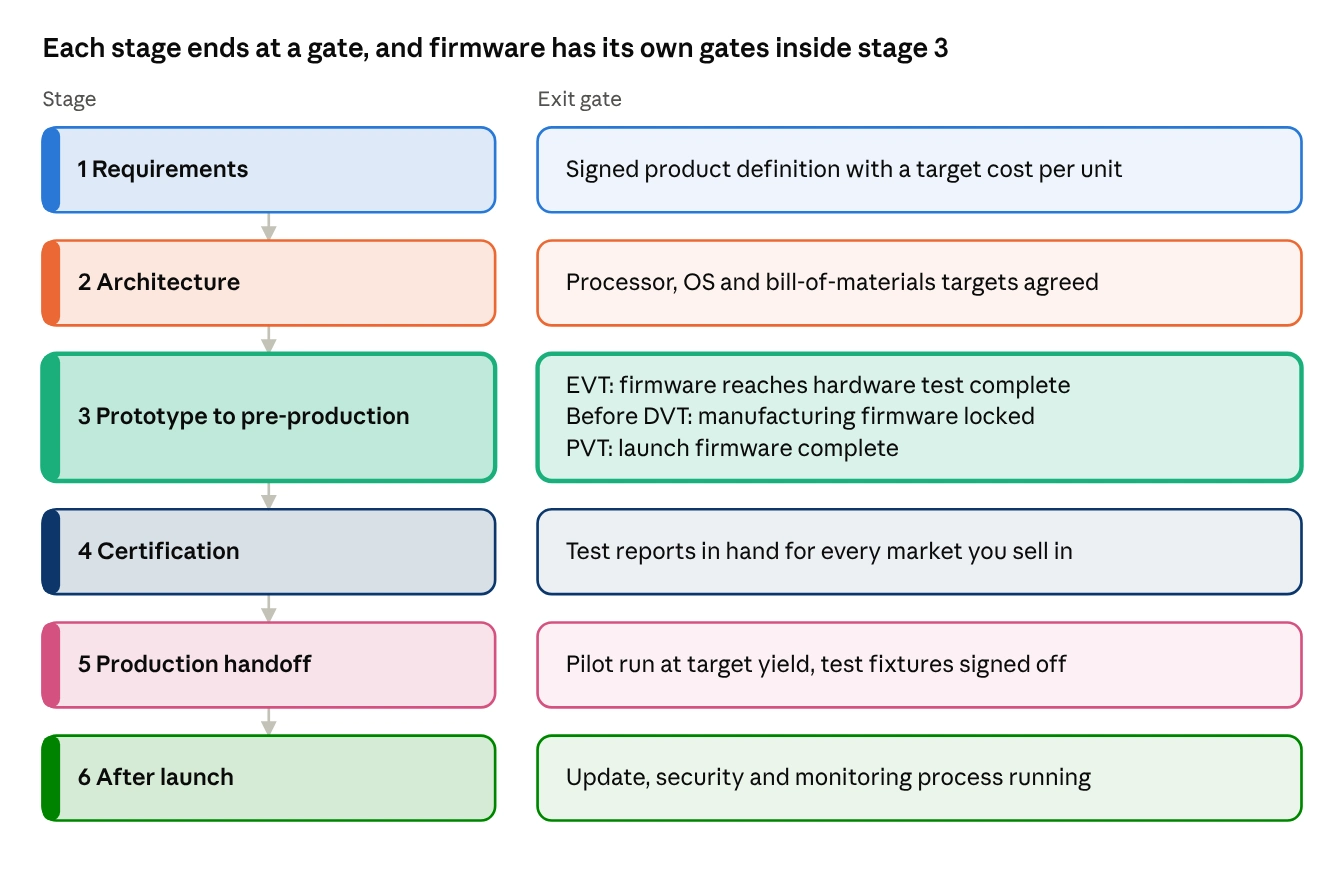
stage-gate overview · 6 stages, firmware gates in stage 3
Read the diagram top to bottom. Stage 3 is where firmware and hardware are most tightly linked, so it carries the most gates. The sections below follow the same order.
What does embedded product development cover?
Embedded product development covers every task needed to ship a device that runs its own software: electronics, firmware, mechanical design, testing, certification and manufacturing.
A complete programme usually includes:
- Electronics: schematics, PCB layout, power and thermal design.
- Firmware: the board support package (BSP), device drivers, an RTOS or embedded Linux, and the application logic.
- Software around the device: companion apps, a cloud back end and an update service.
- Mechanical design: enclosure, connectors and heat paths.
- Test and production: fixtures, factory programming and yield tracking.
These parts depend on each other. A processor change alters the power budget, a power change alters the enclosure, and an enclosure change alters antenna performance and certification. Teams that plan them as one system avoid most late redesigns. That is why embedded systems engineering works best when hardware and firmware sit in the same plan from day one.
Stage 1: How do you define the idea, requirements and feasibility?
Stage 1 ends with a written product definition that states what the device does, who uses it, what it may cost to build, and which rules it must meet.
Write these down before any board is designed:
- The problem and the user, in one sentence each.
- Must-have functions, kept apart from features that can wait for a later release.
- Operating conditions: temperature range, vibration, power source, battery life and connectivity.
- Target cost per unit and expected volume.
- Markets and rules: where the device will be sold and which approvals apply.
Treat each prototype as a way to answer a specific risk, such as whether a sensor reads reliably or whether radio range is enough. A prototype built only to look good answers nothing.
Cost deserves early attention. Imagine a similar product selling for ₹4,000 while your build cost is ₹8,000. That is a business problem before it is an engineering one. Hardware startup post-mortems repeatedly name ignored unit cost and unclear requirements as early causes of failure.
Stage 2: How do you choose the architecture and components?
Stage 2 fixes the processor, the operating layer and the bill-of-materials targets, because changing them later means redoing hardware and firmware together.
Use the table below to build a shortlist, then test it against your cost and volume targets.
| Option | Fits when | Watch for |
| Microcontroller with bare-metal code or an RTOS | Real-time control, low power, small bill of materials | Limited memory; network and display stacks need careful selection |
| Application processor with embedded Linux | Rich interfaces, networking, cameras, on-device processing | Longer boot time, higher power use, BSP and kernel upkeep |
| System on module (SoM) on a carrier board | Small runs and a faster start | Higher unit cost; reliance on one module supplier |
| Custom chip-down board | High volume and tight unit cost | Higher upfront engineering cost (NRE) and more test effort |
Run three checks before you freeze the architecture:
- Can you buy every part at your planned volume, and is there a second source for parts you cannot design around?
- Will the chip vendor support your chosen OS version for the expected life of the product?
- Does the development board you tested hide anything the production board needs? Errors in dev-board designs often carry into production, so review the reference design line by line.
At very high volumes some teams move beyond off-the-shelf chips, which brings in VLSI design work such as custom silicon and physical design. Few products need that, but the choice is easier to make at Stage 2 than at Stage 5.
Stage 3: What are EVT, DVT and PVT builds?
EVT, DVT and PVT are three build stages that move a design from “it works” to “it can be made repeatedly”. EVT proves function, DVT proves the design holds up across variation, and PVT proves the factory can build it.
Companies use these names slightly differently. Some read the V as verification and others as validation, so agree the exit criteria in writing before the first build.
| Build | What it proves | Reported size | Firmware status at exit |
| EVT | The first build, made with the intended parts and process, meets functional requirements | Small; set by the project | Hardware test complete: minimal firmware that lets a user try every major function |
| DVT | The design holds up across variation, and cosmetic and functional needs are met | About 50 to 200 units | Manufacturing firmware locked; application firmware keeps moving |
| PVT | The real line builds the product at the target speed and yield; packaging joins here | Hundreds to thousands of units | Launch firmware complete |
Three habits make these builds smoother:
- Keep manufacturing firmware separate from application firmware. It rarely changes, so the line stays stable while the application improves.
- Build firmware against a test harness so work does not wait for boards. A CI/CD pipeline that builds and tests firmware on every commit supports this.
- Walk the assembly line during DVT with manufacturing engineers. Fixing a process problem here costs far less than fixing it at volume.
For a hardware-side view of each build, Formlabs has a detailed guide to EVT, DVT and PVT.
Stage 4: What certifications does an embedded device need?
Certification decides whether you can legally sell the device, so plan it during design and not after the last build.
Common approvals by market:
- CE and FCC: needed for Europe and the United States. WPC in India accepts CE or FCC test reports from accredited labs when you apply for an equipment type approval.
- BIS CRS (India): mandatory registration for listed electronics and IT products. The product must carry the registration mark, and goods without valid BIS certification do not clear customs.
- WPC ETA (India): required for any product with Bluetooth, Wi-Fi, Zigbee or RFID. A Bluetooth speaker needs both BIS CRS registration and WPC ETA approval.
- TEC and MTCTE (India): mandatory for telecom equipment that is imported, made or sold in India.
A radio module with existing test reports can help, because WPC accepts radio module reports. The finished product still needs its own approvals.
Plan pre-compliance testing early. Hardware startup guides repeatedly describe certification as a gate to the market and not a formality, and teams that leave it to the end often face late redesigns. Rules and product lists change, so confirm the current requirements for your category with a BIS-recognised lab or consultant before you freeze the design.
Stage 5: How do you hand a design over to production?
A working prototype does not guarantee a buildable product. Handoff turns the design into a repeatable factory process.
Work through these steps in order:
- Hold a design-for-manufacturing (DFM) review with the contract manufacturer before any tooling is cut.
- Build test fixtures and automated test scripts, so every unit is checked the same way.
- Prepare a factory programming image. Production teams often find that the prototype build flow cannot produce a production image.
- Run a pilot build and field test before ramp-up, and track yield from the first unit.
- Sign a development and manufacturing contract before volume orders begin, and freeze the design before committing to tooling.
Conditions a lab never shows also matter. Temperature, humidity, vibration, mass soldering and component variation can all change reliability at volume. This is why the pilot run earns its place in the plan.
Stage 6: What happens after launch?
Support after launch decides how long the product stays secure, compliant and useful in the field. Many teams plan the first five stages well and neglect this one.
Build these into the design from the start:
- An over-the-air (OTA) update path, with signed updates and a safe fallback if an update fails.
- Secure boot and protected credential storage, so only trusted firmware runs.
- Field monitoring: crash logs, battery data and error reports that show how real units behave.
- Component end-of-life tracking, with approved alternate parts ready.
- The software and cloud side of the product: companion apps, back-end services and the update server.
Government rules on device security, and the cost of security failures, are pushing manufacturers to plan this stage at the start and not after the first incident.
Which mistakes delay embedded products most often?
Six planning mistakes appear again and again in hardware post-mortems, and each is cheap to prevent early.
- Scheduling by hardware lead times alone. Plan around the whole product: electronics, firmware, mechanical design and test.
- Underestimating cost and time. Build a per-unit cost model before setting a price.
- Leaving certification to the end. Budget for pre-compliance testing during design.
- Copying a development board design into production unchanged. Review it as you would any third-party design.
- Cutting tooling before the design is frozen, or skipping the pilot run. Both turn small issues into expensive ones.
- Using a software-only team for hardware-dependent work. Firmware for embedded devices differs from web or app development, and each hardware feature touches layout, power, thermal design and cost.
How long does embedded product development take, and what drives cost?
Time and cost depend on how complicated the product is, how many radios and interfaces it has, which certifications apply and the production volume, so no single honest figure fits every project.
What moves the plan most:
- Hardware difficulty: layer count, power, thermal and mechanical limits.
- Connectivity: each radio adds firmware, antenna work and certification.
- Certification scope: medical and automotive devices take longer than consumer ones.
- Volume: larger runs justify more cost-reduction work.
- Companion app and cloud: a separate effort with its own budget.
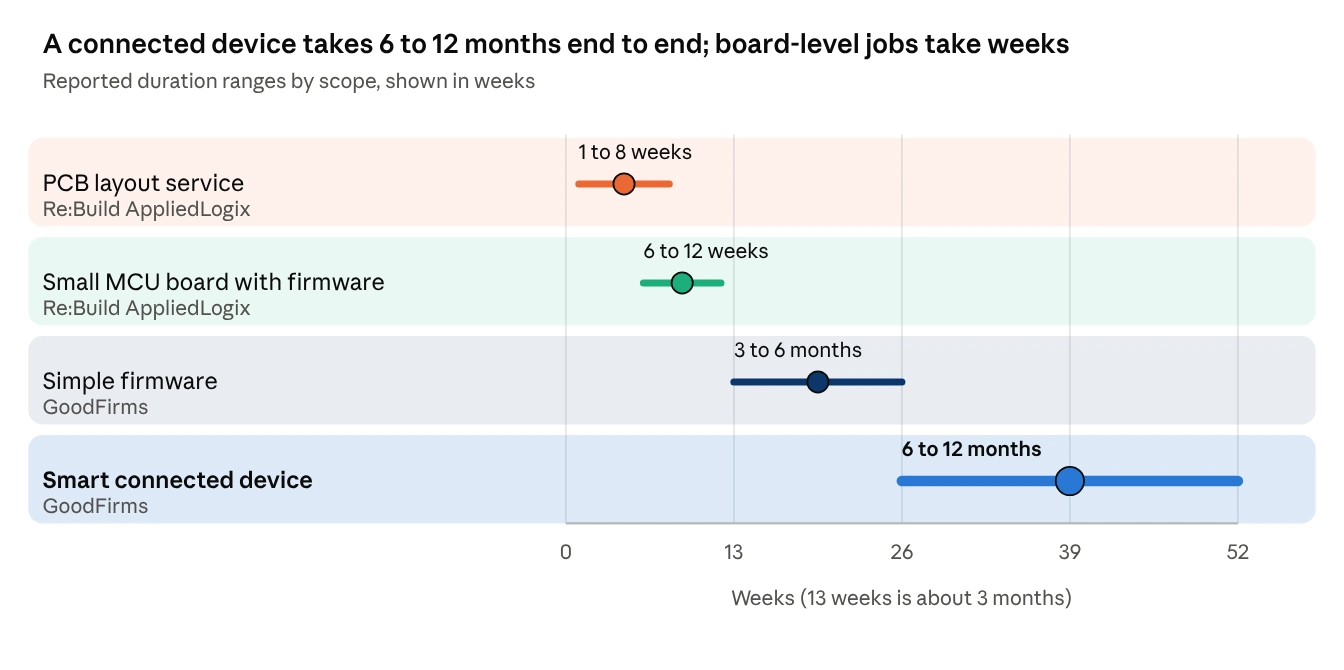
Re:Build AppliedLogix pricing page (US consultancy) and GoodFirms embedded software cost guide, updated Oct 2026 · months converted at 52/12 weeks · scopes differ, so read as a guide
Published ranges show the spread. A board-level job can take weeks, while GoodFirms puts a smart connected device at 6 to 12 months. The same guide gives automotive and industrial platforms 1 to 3 years because of testing and compliance work. These figures come from a US consultancy and a B2B directory, so use them as a guide and ask your partner for a scoped quote in ₹.
How do you choose an embedded product development partner?
Choose a partner that can own firmware, hardware and the software around the device, because most delays happen at the handoffs between them.
Ask every shortlisted team:
- Can you show work at each stage, from requirements to production support?
- How do you plan firmware gates against EVT, DVT and PVT?
- Which certification routes do you know for my markets, including BIS and WPC?
- Who owns the update pipeline after launch?
- What happens when the board design changes mid-project?
PQ Angels Technologies is a Bengaluru-based engineering company built around a silicon-to-software model: one team across VLSI design, embedded systems, software development and DevOps. For a product team, that means fewer handoffs between chip, firmware, application and cloud work. If you are scoping a device and want a view on your stage and risks, you can book a discovery call.
FAQs on embedded product development
What are the stages of embedded product development?
There are six: requirements, architecture, prototype and pre-production builds (EVT, DVT, PVT), certification, production handoff and support after launch. Each ends at a gate, and firmware has its own gates inside the build stage.
How long does it take to develop an embedded product?
It depends on scope. Published ranges run from a few weeks for board-level work to 6 to 12 months for a smart connected device, and 1 to 3 years for automotive or industrial platforms. Run certification and the pilot build alongside late development so they do not add months at the end.
What is the difference between EVT, DVT and PVT?
EVT confirms the design works, DVT confirms it holds up across variation, and PVT confirms the factory can build it at target speed and yield. Names vary between companies, so write down the exit criteria for each build.
Can I take a development board design straight into production?
Rarely without changes. Errors and inefficiencies in development board designs often carry into production, and the board may lack the compliance and cost work a product needs. For very small runs, a system on module with a carrier board can be used directly.
Does my embedded device need BIS or WPC approval in India?
If it falls in a BIS-listed category, it needs BIS CRS registration. Any product with Bluetooth, Wi-Fi, Zigbee or RFID needs WPC ETA approval, and telecom equipment needs TEC MTCTE. Confirm your exact category with a BIS-recognised lab or consultant, since lists change.
Why do working prototypes fail in mass production?
Mass soldering, component variation, environmental stress and process drift show up only at volume. DVT and PVT builds, and a pilot run, exist to catch them before launch.
To sum up
Embedded product development rewards early decisions on cost, certification and firmware gates. Define the product, pick the architecture with your volume in mind, treat EVT, DVT and PVT as gates with written exit criteria, plan BIS and WPC approvals during design, and build the update path before launch.
If you want a second opinion on your plan, contact the PQ Angels team and describe where your device stands today.
