
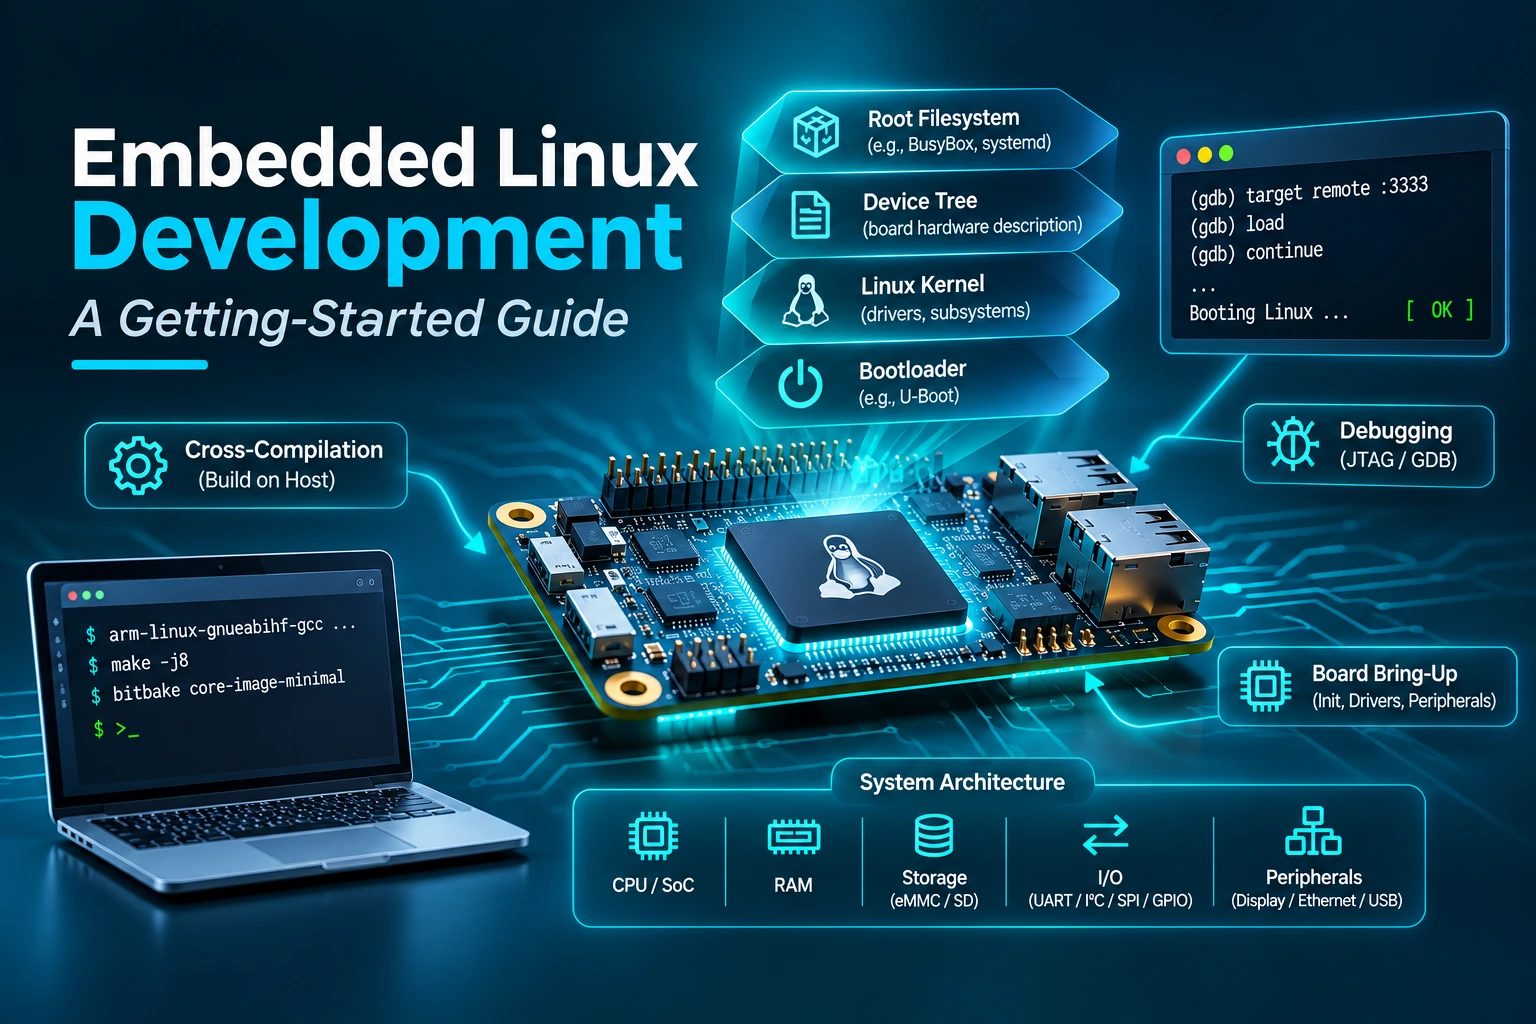
Embedded Linux development is the work of building a custom Linux system for one specific piece of hardware, from the compiler and bootloader to the kernel, drivers and the files that run on the device. It is how routers, vehicle infotainment units, medical monitors and factory gateways get an operating system that fits their processor, memory and purpose.
This guide is for engineers who know C and the Linux command line but have not yet built a board image of their own. By the end, you will know what the building blocks are, how to choose between Yocto and Buildroot, how a first image comes together, and where beginners usually lose time.
Quick answer: start with a supported board, use Buildroot for your first image, learn the boot flow, and move to Yocto when your product needs long-term maintenance.
What Is Embedded Linux Development?
Embedded Linux is a version of the Linux operating system configured and built for a dedicated device instead of a general-purpose computer. Engineers select only the kernel features, drivers and software the product needs, then package them into an image that is flashed onto the hardware.
Embedded Linux development differs from using desktop Linux in four ways:
- Built, not installed: you cross-compile on a host PC and flash the result to the board.
- Fixed hardware: the kernel is configured for one board, and a device tree describes that board to the kernel.
- Tight limits: memory, storage and boot time are budgeted, and images range from a few megabytes to several hundred.
- Long life: devices stay in the field for years, so updates, security patches and licence tracking matter from day one.
You will find embedded Linux in automotive systems, industrial automation, networking equipment, medical devices, smart-home products and consumer electronics.
Embedded Linux or an RTOS: Which Should You Choose?
Choose embedded Linux when the device has a capable application processor, needs networking, file systems, USB or a display, and can accept a boot time of a few seconds. Choose a real-time operating system (RTOS) when the device is a microcontroller with small memory and strict timing demands.
Factor | Embedded Linux | RTOS |
|---|---|---|
Typical hardware | Application processors (Cortex-A, many RISC-V and x86 parts) with an MMU | Microcontrollers (Cortex-M and similar), often without an MMU |
Memory | Several MB of RAM at the very least; most products use far more | A few KB to a few MB |
Timing | Soft real-time by default; the PREEMPT_RT patches, part of mainline since kernel 6.12, tighten response times | Designed for predictable, bounded response times |
Boot time | Seconds, with tuning possible | Usually well under a second |
Drivers and networking | Very large driver and protocol base: TCP/IP, USB, Wi-Fi, file systems | Smaller, chosen per project |
Licensing | Kernel under GPL v2, so compliance work is needed | Varies: FreeRTOS is MIT, Zephyr is Apache 2.0, others are commercial |
Rule of thumb:
- Hard deadlines on a small chip, such as a motor controller: RTOS.
- Connectivity, a screen, containers or a large software stack: embedded Linux.
- Both needs in one product: a microcontroller running an RTOS next to a Linux processor, a split many products use.
Teams that need both can look at the embedded systems solutions PQ Angels delivers across Linux and RTOS platforms.
Quick Decision Flow
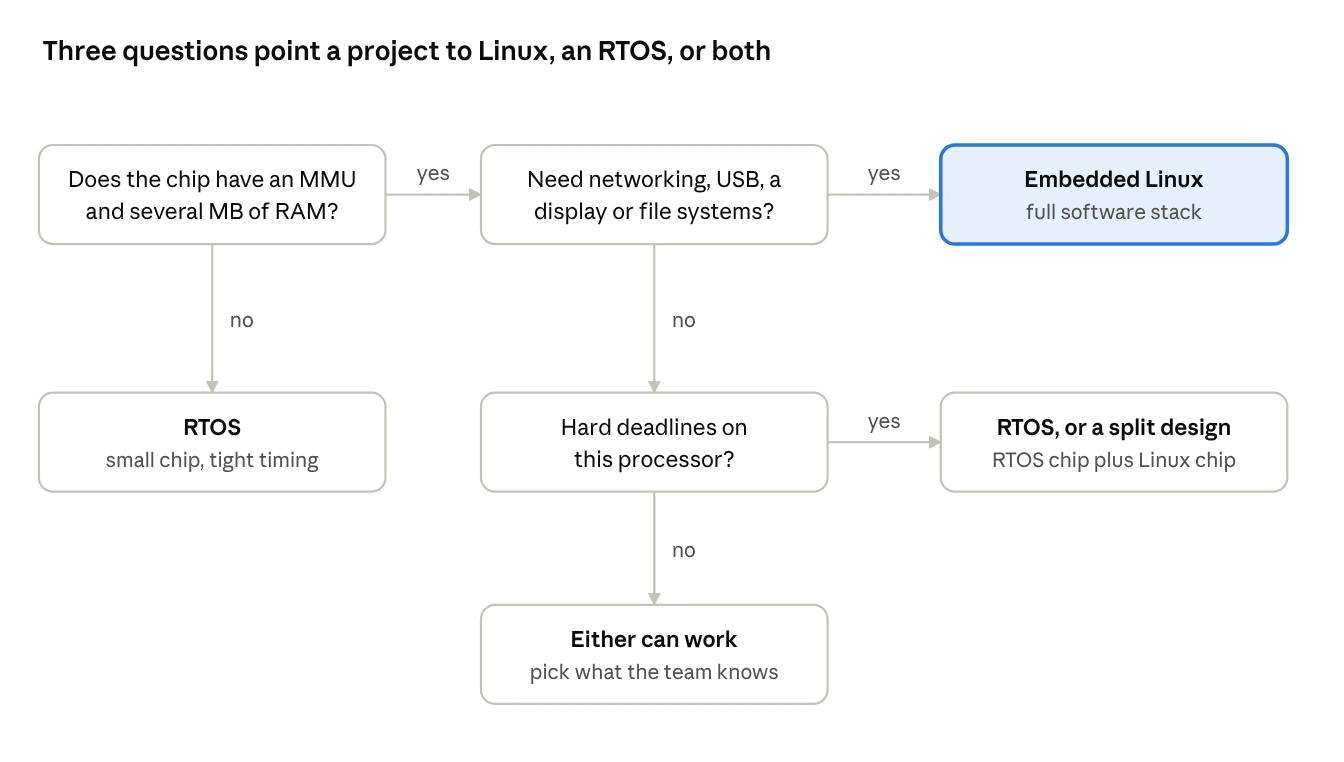
decision flow · 3 questions, 4 outcomes
If the chip has no MMU or very little RAM, the answer is an RTOS. If it has both and the product needs a large software stack, the answer is embedded Linux.
The Building Blocks of an Embedded Linux System
Every embedded Linux system is made of four parts, whatever board or build system you use.
Toolchain and cross-compilation
The toolchain is the compiler, linker, C library and kernel headers that build code for the target. Targets are usually too slow or small to compile on, so you cross-compile on a host PC. The toolchain name shows the target, such as arm-linux-gnueabihf.
- Match the C library (glibc, musl or uClibc-ng) between the toolchain and the root filesystem.
- Keep the kernel headers in step with the kernel you will boot.
Bootloader (U-Boot)
The bootloader starts the hardware. It initialises RAM and the storage controller, loads the kernel and the device tree into memory, and hands over control. U-Boot is a widely used open-source bootloader, and many vendor SoC kits ship with a U-Boot port.
Linux kernel and device tree
The kernel manages processes, memory and drivers. You configure it with a defconfig or menuconfig so it contains only what your board needs. The device tree is a text description of the board’s hardware, compiled into a .dtb file that the bootloader passes to the kernel.
Root filesystem and init
The root filesystem holds the libraries, tools, configuration files and your application. Small systems often use BusyBox for the command-line tools, and an init system such as BusyBox init or systemd starts services at boot. Many products use a read-only root filesystem with a separate writable data partition, which survives power loss better.
How the Layers Stack Up
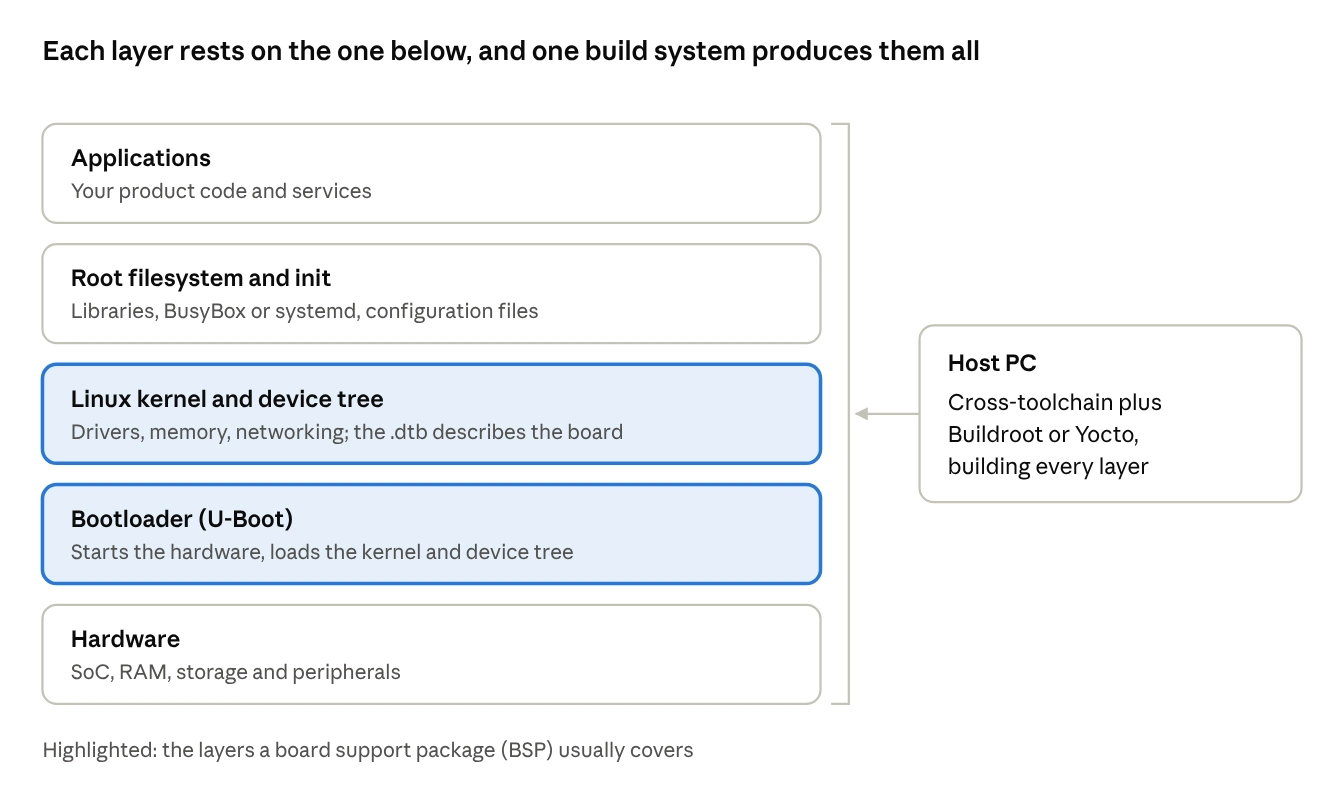
software stack · 5 layers and the host build
Your application depends on the root filesystem, which depends on the kernel, which depends on the bootloader and the hardware. A fault low in the stack shows up as a confusing fault higher up.
From Power-On to User Space
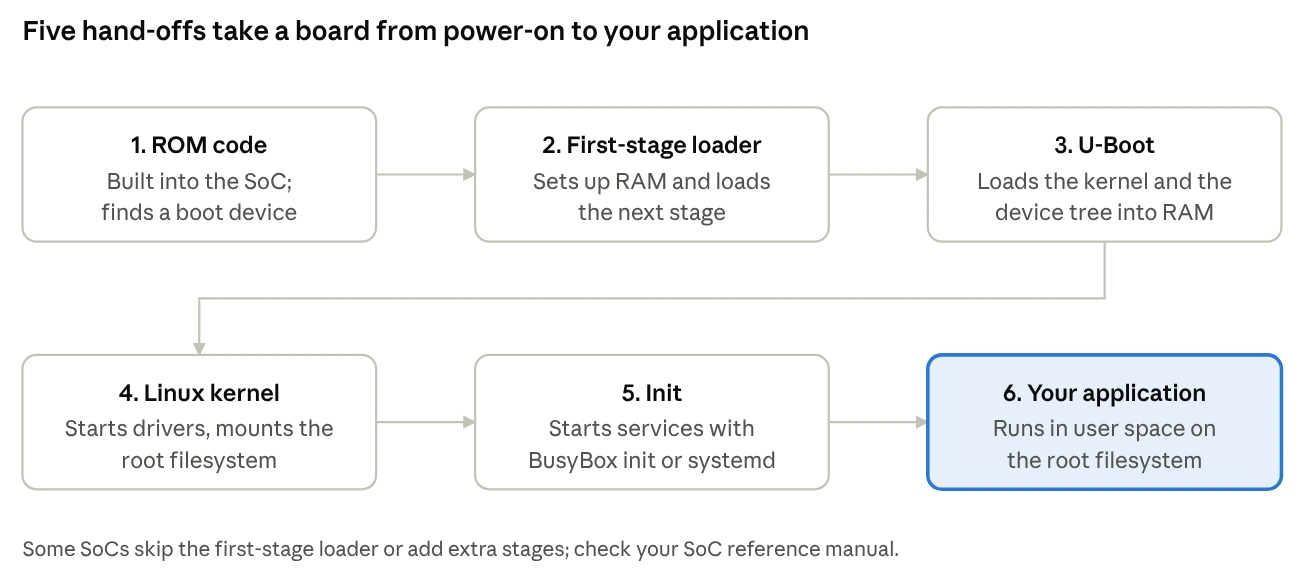
boot flow · 6 stages, 5 hand-offs
Each stage prepares the next one. When a board fails to boot, find the last stage that printed a message on the serial console, and start debugging there.
Setting Up Your Embedded Linux Development Environment
A 64-bit Linux host, one development board and a serial cable are enough to start embedded Linux development.
- Host machine: a recent Ubuntu LTS release is the safest choice, since build systems document it first. A virtual machine or container works but builds slower. Yocto needs far more disk space and RAM than Buildroot, so check the current host requirements in its quick build guide before sizing your machine.
- First board, three common choices:
- Raspberry Pi: a large community and easy setup, good for learning the build flow and user space.
- BeagleBone Black: well-documented, with GPIO, I2C and SPI exposed, good for practising device trees and drivers.
- NXP i.MX development board: closer to what products use, with vendor kernels and Yocto layers.
- No board yet: QEMU can run an emulated ARM board, so you can finish your first build before buying hardware.
- Serial console: a USB-to-serial adapter with 3.3 V logic. Connecting a 5 V adapter to a 3.3 V board can damage it.
- Debug and flashing: a JTAG debugger helps with early boot problems, and an SD card or eMMC holds the image.
Yocto or Buildroot: Which Build System Should You Choose?
Buildroot is the easier first step, and Yocto is the usual choice for products that need many variants and years of maintenance. Both produce a toolchain, bootloader, kernel and root filesystem from source.
Factor | Buildroot | Yocto Project |
|---|---|---|
Learning curve | Gentler: one configuration menu and Makefiles | Steeper: layers, recipes and BitBake metadata |
First build | Shorter, in a single pass | Long, though later builds reuse the shared state cache |
Customisation | Suits a fixed set of packages | Very flexible through layers |
Long-term maintenance | Simple, but upgrades often mean a full rebuild | Built for product lines, many machines and release control |
Vendor support | Good for common boards | Many silicon vendors ship BSPs as Yocto layers |
Best fit | Prototypes, small fixed-function devices | Production teams and multi-variant products |
How to decide:
- One board, one product, a small team: start with Buildroot.
- A vendor BSP delivered as Yocto layers, or several hardware variants: use Yocto.
- Still learning: build U-Boot and the kernel by hand once, then pick a build system. Learners on forums often report that starting with Yocto hides how the pieces fit together.
Whichever you choose, move the build into a CI pipeline early so every image is reproducible. That is where embedded work meets DevOps practice. The official Yocto Project documentation is the best place to read the quick build guide and manuals.
Build Your First Embedded Linux Image, Step by Step
This route uses Buildroot, which suits a first image. The same order applies to a Yocto build.
- Prepare the host. Install the compiler, make, git and the libraries your Buildroot release lists as host requirements.
- Expected: the tools report their versions.
- Common failure: a missing package shows up halfway through the build. Read the error for the tool name and install it.
- Fetch Buildroot. Download a current stable release from the Buildroot project.
- Expected: a source tree with a configs folder.
- Common failure: an old release that lacks your board.
- Load a board configuration. Buildroot ships ready-made defconfigs for popular boards and for QEMU. Run make with the matching defconfig name.
- Expected: a .config file in the build directory.
- Common failure: choosing a defconfig for a different board revision.
- Adjust the configuration if needed. Run make menuconfig to change the hostname or add a package.
- Expected: a saved configuration.
- Common failure: adding many packages, which grows build time and image size.
- Build. Run make and wait. Buildroot builds the toolchain, bootloader, kernel and root filesystem.
- Expected: image files in the output/images folder.
- Common failure: a download error from a source server. Run make again.
- Flash the image. Write it to an SD card or eMMC with an imaging tool or dd.
- Expected: a bootable card.
- Common failure: writing to the wrong disk. Check the device name with lsblk first.
- Boot and verify over serial. Connect the serial adapter, open a terminal at the baud rate in your board’s documentation (115200 is common), and power on.
- Expected: boot messages, then a login prompt. Run uname -a to confirm the kernel.
- Common failure: no output, which usually means swapped TX and RX wires, the wrong baud rate or a wrong console setting.
Device Drivers and th
e Device Tree
A device tree tells the kernel which hardware exists on your board, and a driver then controls it. This split lets one kernel binary serve many boards, because the board details live in the .dtb file.
A device tree entry names the device, its bus address, its interrupt or GPIO lines and a compatible string. The kernel matches that string to a driver and calls the driver’s probe function.
Three driver types cover most beginner work:
- Character drivers: expose a device to user space through a file in /dev.
- Platform drivers: control peripherals built into the SoC, such as timers, UARTs and GPIO banks.
- I2C and SPI client drivers: control chips on a bus, such as sensors and displays.
Before you write a driver, check whether the mainline kernel already has one. Often you only need to switch it on in the kernel configuration and describe the chip in the device tree. The same skills appear on PQ Angels’ Linux BSP and device driver engineer career page.
Debugging Embedded Linux Systems
Start with the serial console. It shows the bootloader and kernel messages before networking or storage works, so it is your first and most reliable tool.
- dmesg and the boot log: show driver probe results and errors.
- printk and pr_debug: add kernel messages, or switch them on for one driver.
- ftrace and perf: trace kernel functions and find where time goes.
- gdb with gdbserver: debug applications on the target from your host.
- strace: show the system calls an application makes.
- JTAG: halts the processor when boot fails before any output appears.
Three boot failures are common:
- Kernel panic, unable to mount root filesystem: a wrong root= argument, or a missing storage driver.
- Silence after the Starting kernel message: a wrong console setting or a device tree that does not match the board.
- Init not found: a missing /sbin/init, or binaries built for the wrong architecture.
Common Mistakes Beginners Make
- Mixing toolchain and target libraries: a C library mismatch causes errors that look unrelated.
- Editing generated build output: changes vanish on the next rebuild. Change the configuration, recipe or patch instead.
- Ignoring licences: GPL components come with source obligations, and both build systems can produce licence information for you.
- Adding packages just in case: every package grows the image and widens the security surface.
- Leaving updates until last: plan a read-only root filesystem and a safe update path early.
Where PQ Angels Technologies Fits In
Moving from a working prototype to a product is where many embedded Linux projects slow down. PQ Angels Technologies, a Bengaluru-based product engineering company, works on this stage: board bring-up, U-Boot and kernel porting, Linux device drivers, and root filesystems built with Yocto or Buildroot, as listed on its embedded systems solutions page.
The same team also covers VLSI design, software and DevOps. That means a BSP engineer can work alongside the people who design the chip and the people who run the build pipeline, which cuts hand-offs between separate vendors.
If you have a board waiting for bring-up, or a BSP that is hard to maintain, you can book a discovery call and talk it through with an engineering lead.
Frequently Asked Questions
What is embedded Linux development?
It is the process of building a custom Linux system for a specific device: choosing a toolchain, bootloader, kernel and root filesystem, describing the hardware with a device tree, and adding drivers and applications until the image runs reliably on the target board.
Is embedded Linux hard to learn, and what should I learn first?
It is learnable if you know C and the Linux shell. Learn the pieces in boot order first: cross-compilation, U-Boot, the kernel, the device tree and the root filesystem. Then move to Buildroot or Yocto, which automate those steps. Starting with Yocto alone tends to hide how the parts fit together.
Yocto or Buildroot: which is better for beginners?
Buildroot, because it is simpler and builds faster. Choose Yocto when a silicon vendor supplies a Yocto-based BSP, or when your product has several hardware variants and a long support life.
Which board should I start with?
A Raspberry Pi for the gentlest start, a BeagleBone Black for hands-on device tree and driver practice, or an NXP i.MX development board if you want a path close to production work. QEMU works if you have no hardware yet.
Do I need kernel programming to start?
No. You can configure the kernel, edit a device tree, build a root filesystem and ship an application without writing a driver. Kernel programming becomes useful once a peripheral has no mainline driver.
Final Thoughts
To sum up, embedded Linux development starts with understanding the boot flow, then automating it with Buildroot or Yocto. Build one image on a board you can hold, learn to read the serial log, and add features only when the product needs them. If you want an experienced team to take a board from bring-up to production, book a discovery call with PQ Angels.
